


The use of Web development in mobile applications is an increasing trend. However, intermittent network availability is a big obstacle to using Web technology as part of a cloud infrastructure. A traditional Web application simply doesn’t work without a network. One solution to this problem is to use two features of the HTML5 Standard (see Related topics):
- Offline Web applications
- Client-side database storage
The user can use cloud functions on a mobile device, work offline with a locally deployed application on a local database, and share data with the rest of the cloud when going online again.
In this article, learn the technical details for a typical usage scenario. A prototype of a simple inventory management application demonstrates the HTML5 technology.
Download the source code for the example application in this article from the Download table below.
Overview
Figure 1 shows an overview of the major components of the sample application architecture.
Figure 1. Core elements of an offline Web application
- HTML page
- The HTML page, the core of the application, has the model role. It contains the displayed data and the (default) render information. The HTML elements of the page are organized in a hierarchy of the HTML Document Object Model (DOM) tree. User-initiated events cause a conventional request-response cycle with a page load and the execution of associated JavaScript functions.Remarkably, this application consists of a single HTML page without the need for loading of further HTML pages through the request-response cycles. The whole action is on one page.
- JavaScript
- The JavaScript element contains the controller functions of the application. HTML elements are bound via event handlers to JavaScript functions. JavaScript can access the HTML DOM tree of the application with all user interface (UI) elements and use it as data input for computation. The results of the processing can be presented to the user by modifying the HTML page.
- Cascading Style Sheet
- The Cascading Style Sheet (CSS) describes how the HTML page is rendered. The view task is omitted here to simplify the solution. In this stage of expansion, only the default rendering behavior of the HTML elements are used.For mobile devices, there are various JavaScript/CSS libraries and frameworks to deliver a near native user experience with Web applications (for example, iUi for the iPhone). See Related topics for more information. Though necessary to increase the user acceptance, this approach has the disadvantage of platform dependency.
- Database
- The HTML5 standard introduced local database storage. It is implemented in current versions of the Apple® Safari browser. The browser provides an embedded database, with SQLite, that can be accessed from the JavaScript by processing SQL queries. The business data of the application model is stored here.
- Manifest
- The manifest file is the mandatory deployment descriptor component for an offline Web application. It simply lists all the files that need to be loaded.
Sample application
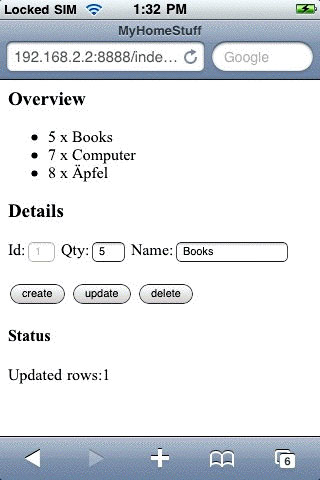
This section provides an overview of the sample application, called MyHomeStuff. It is a simple inventory management application that lets you keep track of items you own. Figure 2 shows the application on the iPhone.
Figure 2. iPhone view
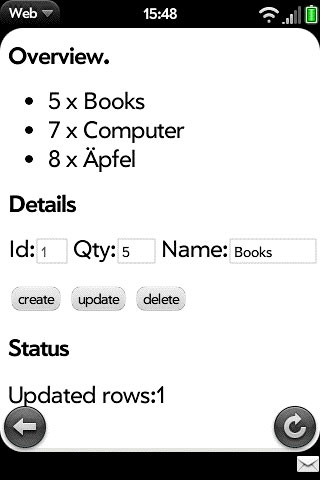
For simplicity, the synchronization of data with the server is omitted. Figure 3 shows the MyHomeStuff inventory management application in the Palm Pre Web browser.
Figure 3. Palm Pre view
The list in the upper part of the screen gives an overview of all entered items (books, computer, and so on).
When a user selects an item in the list, the details (Id, Quantity, Name) of the item are shown in the middle of the form. The details of the selected item can be changed using the Update button. The selected item can also be deleted from the application using the Delete button. New items can be created by entering the item’s quantity and name in the form and selecting the Create button.
The application Status is displayed in the lower part of the screen.
HTML details
The HTML page contains declarations, meta tags for a mobile-optimized display, references to external files (manifest, JavaScript, css), and essential HTML elements that form the basic structure of the application. Listing 1 shows the code.
Listing 1. HTML code
|
1
2
3
4
5
6
7
8
9
10
11
12
13
14
15
16
17
18
19
20
21
22
23
24
25
26
27
28
29
30
|
<!DOCTYPE HTML> <html manifest="MyHomeStuff.manifest"> <head> <meta name="viewport" content="width=device-width; initial-scale=1.0; maximum-scale=1.0; user-scalable=0;"> <title>MyHomeStuff</title> <script type="text/javascript" src="MyHomeStuff.js" ></script> </head> <body onload="onInit()"> <h3>Overview</h3> <ul id="itemData" ></ul> <h3>Details</h3> <form name="itemForm"> <label for="id">Id: </label> <input type="text" name="id" id="id" size=2 disabled="true"/> <label for="amount">Amount: </label> <input type="text" name="amount" id="amount" size = 3/> <label for="name">Name: </label> <input type="text" name="name" id="name" size=16 /> <br> <br> <input type="button" name="create" value="create" onclick="onCreate()" /> <input type="button" name="update" value="update" onclick="onUpdate()" /> <input type="button" name="delete" value="delete" </form> <h4>Status</h4> <div id="status"></div> </body></html> |
Event handler attributes of the HTML elements specify which JavaScript functions are executed when the page is initially loaded (onload) and button elements are clicked (onclick).
The HTML page of an offline Web application starts with the tag <!DOCTYPE HTML>. The manifest is referenced through the manifest attribute in the tag <html manifest="MyHomeStuff.manifest">.
As mentioned, the manifest specifies the required files that need to be loaded into the cache. This application consists of an HTML file and a JavaScript file. The HTML file with the reference to the manifest is automatically included in the application cache. The manifest contains only the following:
Listing 2. Manifest file
|
1
2
3
|
CACHE MANIFESTMyHomeStuff.js |
JavaScript details
The JavaScript code consists of three main blocks:
- Initialization functions
- db (crud) and view update functions
- Some little utility functions
The first block contains the event handler to initialize the application (onload) and the initialization of the database, as shown in Listing 3.
Listing 3. JavaScript init code
|
1
2
3
4
5
6
7
8
9
10
11
12
13
14
15
16
17
18
19
20
21
22
23
24
25
26
27
28
29
|
function onInit(){ try { if (!window.openDatabase) { updateStatus("Error: DB not supported"); } else { initDB(); createTables(); queryAndUpdateOverview(); } } catch (e) { if (e == 2) { updateStatus("Error: Invalid database version."); } else { updateStatus("Error: Unknown error " + e + "."); } return; }}function initDB(){ var shortName = 'stuffDB'; var version = '1.0'; var displayName = 'MyStuffDB'; var maxSize = 65536; // in bytes localDB = window.openDatabase(shortName, version, displayName, maxSize);} |
In the code above:
- The
onInitfunction first checks the existence of the mandatoryopenDatabasefunction, whose absence signals that the browser doesn’t support a local database. - The
initDBfunction opens the database of the HTML5 browser. - After successfully opening the database, the SQL DDL to create the database table is executed. Lastly, the functions that query the existing records and populate the HTML page with the data are called.
Each function of the second JavaScript block has a part for DB access and presentation logic. This consolidation of logic is characteristic of a Model 1 architecture (see Related topics), which is the easiest way to develop simple Web applications. For a real-world scenario, an architecture with a clear separation of the Model View Controller (MVC) parts would be appropriate.
To build the example overview list, the queryAndUpdate function is called from the event handler functions. Listing 4 shows the code.
Listing 4. JavaScript overview code
|
1
2
3
4
5
6
7
8
9
10
11
12
13
14
15
16
17
18
19
20
21
22
23
24
25
26
27
28
29
30
31
32
33
34
35
36
37
38
|
function queryAndUpdateOverview(){ //remove old table rows var dataRows = document.getElementById("itemData").getElementsByClassName("data"); while (dataRows.length > 0) { row = dataRows[0]; document.getElementById("itemData").removeChild(row); }; //read db data and create new table rows var query = "SELECT * FROM items;"; try { localDB.transaction(function(transaction){ transaction.executeSql(query, [], function(transaction, results){ for (var i = 0; i < results.rows.length; i++) { var row = results.rows.item(i); var li = document.createElement("li"); li.setAttribute("id", row['id']); li.setAttribute("class", "data"); li.setAttribute("onclick", "onSelect(this)"); var liText = document.createTextNode(row['amount'] + " x "+ row['name']); li.appendChild(liText); document.getElementById("itemData").appendChild(li); } }, function(transaction, error){ updateStatus("Error: " + error.code + "<br>Message: " + error.message); }); }); } catch (e) { updateStatus("Error: Unable to select data from the db " + e + "."); }} |
In the code above:
- The old data is removed from the DOM tree.
- A query to select all data sets is executed.
- For every data set in the result, an HTML list element is created and appended to the list.
- An event handler,
onSelect, is added to every list element to respond on a click.
The functions of this block also contain the event handler for the button bar and the list with onUpdate, onDelete, onCreate, and onSelect. Listing 5 shows the code for onUpdate. (onCreate and onDelete have a similar structure, so aren’t shown here; you can download all the source code for the example application from the table below.)
Listing 5. JavaScript update code
|
1
2
3
4
5
6
7
8
9
10
11
12
13
14
15
16
17
18
19
20
21
22
23
24
25
26
27
28
29
30
|
function onUpdate(){ var id = document.itemForm.id.value; var amount = document.itemForm.amount.value; var name = document.itemForm.name.value; if (amount == "" || name == "") { updateStatus("'Amount' and 'Name' are required fields!"); } else { var query = "update items set amount=?, name=? where id=?;"; try { localDB.transaction(function(transaction){ transaction.executeSql(query, [amount, name, id], function(transaction, results){ if (!results.rowsAffected) { updateStatus("Error: No rows affected"); } else { updateForm("", "", ""); updateStatus("Updated rows:" + results.rowsAffected); queryAndUpdateOverview(); } }, errorHandler); }); } catch (e) { updateStatus("Error: Unable to perform an UPDATE " + e + "."); } }} |
In the above code:
- The field values of the form are read and validated.
- If the values are valid, the update query will be executed.
- The result of the query is shown in the updated HTML page.
The onSelect function is executed when the user selects a list element. The details form will be filled with the data of this element using the code in Listing 6.
Listing 6. JavaScript select code
|
1
2
3
4
5
6
7
8
9
10
11
12
13
14
15
16
17
18
19
20
21
|
function onSelect(htmlLIElement){ var id = htmlLIElement.getAttribute("id"); query = "SELECT * FROM items where id=?;"; try { localDB.transaction(function(transaction){ transaction.executeSql(query, [id], function(transaction, results){ var row = results.rows.item(0); updateForm(row['id'], row['amount'], row['name']); }, function(transaction, error){ updateStatus("Error: " + error.code + "<br>Message: " + error.message); }); }); } catch (e) { updateStatus("Error: Unable to select data from the db " + e + "."); }} |
In the code above:
- The ID of the selected element is determined.
- A select-query is executed.
- A function to update the detail form with the read data set is called.
The last JavaScript block with utility functions starts with data handlers, which are needed as parameters for the queries.
Listing 7. JavaScript handler code
|
1
2
3
4
5
6
7
|
errorHandler = function(transaction, error){ updateStatus("Error: " + error.message); return true;}nullDataHandler = function(transaction, results){} |
To avoid redundancy, utility functions fill the fields of the detail form (updateForm) and status message (updateStatus), as shown below.
Listing 8. JavaScript util code
|
1
2
3
4
5
6
7
8
9
|
function updateForm(id, amount, name){ document.itemForm.id.value = id; document.itemForm.amount.value = amount; document.itemForm.name.value = name;}function updateStatus(status){ document.getElementById('status').innerHTML = status;} |
Deployment
An iPhone 3GS and a Palm Pre were used to run the example on a real HTML5 mobile device. A current Safari browser on a computer also works.
You can download and deploy the files for the application in an HTTP server from the Download table below. The manifest file must be served by the HTTP server with the text/cache-manifest Mime type. After opening the application on the iPhone, save the Bookmark and go in the offline airplane mode. The application will then be opened when the bookmark is selected, and it works without a network.
Summary
The focus of this article was the technical angle for offline Web applications. A prototype of a simple inventory management application demonstrated the HTML5 technology with a locally deployed application and a local database.